Add and Configure Users

Add and configure new users for your site to control who can modify which content. Add users to groups for easier permission management.
This is going to be a new change!
Before Adding Users
MindTouch allows you to control how users will be able to interact with the site, so it's important to know how you want a specific user (or group of users) to be able to interact with the site before adding them. What content should they be able to access? Will they be able to create or edit content? If so, will they need to publish content to the site? Create drafts? Should they be able to do this throughout the site, or only in a certain area? These are all important questions to answer.
Understanding Different Types of Users
There are two main types of user profiles that you can create within MindTouch. Community Members have a login and are able to view content, but can never create or edit content. Pro Members are users who are able to access reports, the controls dashboard and have the option of being allowed to edit, create or publish content to the site.
Community Member
Community Members are users who are strictly accessing content - they cannot create or edit content. Community members are frequently customers or low-level service agents. Community Members have a login credentials, and their site interaction is captured for reporting and analytics.
Pro Members
Pro Members are typically your users who are creating or editing content on the site. Each Pro Member is assigned a roll that controls the level of permission that they have for creating or changing content on the site. These rolls range from view only to admin, allowing you to control if they are able to just view content, create drafts of content, publish to the site or change site settings.
Understanding User Groups
Just as you can set page and authoring permissions at the user level, you can do the same using group roles. For this reason, it is important to understand what groups your new user or users will be a part of prior to adding them to the system.
Read more about Group Roles.
Select Contributions
Overview of Groups and Roles
Add a Single User to Your Site
To add new users to your site and assign them to specific contributing groups, perform the following steps:
- On the MindTouch toolbar, navigate to Site tools > Control panel.
- In the control panel, under Users & Groups, select Users.
- Under Users & Groups, click Add New User.
- Configure your new user:
- Username. Choose a unique username. Do not include spaces in your usernames or the search function may not work properly.
- Display Name. Shown on MindTouch pages such as in the Last updated byline.
- Email. Address to be used for automatic correspondence and notifications.
- Password. Leave blank if you prefer the user be sent a system-generated password.
- Assign either the Community Member or Pro Member role.
Community members cannot contribute to your documentation and cannot be assigned a pro member role. If you are adding the user as a Pro Member, choose the Pro Member role from the drop-down menu. Choose Viewer to limit overall permissions and assign to groups for increased permissions where needed.

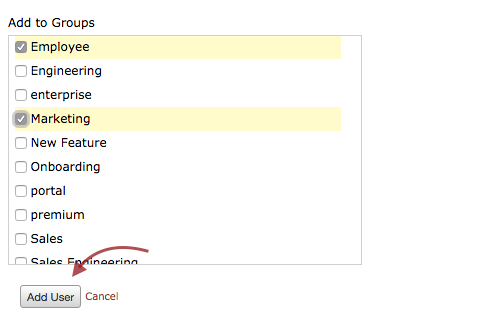
- Add the user to the group(s) that will be granted privileges in the public-facing sections the user is to contribute to.

- Click Add User to save.
After you add a new user, the user will receive a confirmation email containing a link to your site with access details. Remind the user to sign in to MindTouch and to reset their password by selecting the "forgot password" option at login.
User email addresses are used for all communications from your MindTouch site, so also remind users to allowlist your site (i.e. to remove your site from any spam filters) to ensure they receive important site information.
Add Multiple Users to Your Site
To add new users to your site and assign them to specific contributing groups, perform the following steps:
- On the MindTouch toolbar, navigate to Site tools > Control panel.
- In the control panel, under Users & Groups, select Users.
- Under Users & Groups, click Add Multiple Users User.

- Add usernames and Email Addresses for users and select Community Member or Pro Member. All users added in this batch will be either one or the other, you cannot do a single group add with mixed Community Member and Pro Members.

- If adding Pro Members, select the role for this batch of users.

- Add your group of users to appropriate groups. All users added in this batch will be included in all groups selected.

- Click Add User to save.
After you add a new user, the user will receive a confirmation email containing a link to your site with access details. Remind the user to sign in to MindTouch and to reset their password by selecting the "forgot password" option at login.
User email addresses are used for all communications from your MindTouch site, so also remind users to allowlist your site (i.e. to remove your site from any spam filters) to ensure they receive important site information.
Attached PDFs and Other Supported File Types
Any attached files can easily be linked to an article to show off the file in-browser.

